I found it bit difficult to get all the steps for migration of Non-ASM 11g database to ASM 11g. All most all of the web links i found starts directly with RMAN commands to do the actual job. Since in 11g we need to install the grid infrastructure seperatly for ASM, so i thought of posting a complete steps of doing migration in a single post. In 10g, ASM creation is included in the same installer through which we install database, so that was bit easy and straight forward. But 11g has a different installer for ASM. Let’s start this post and following assumptions are made:
1) I have a database YYAPRD running on normal file system
2) I have created disks DG1, DG2, DG3 and DG4 which will be used during ASM instance creation
I can’t include the steps for creating disks as i don’t have much experties on that. I just followed few links to create these disks. The links, which i have followed can be found here. Follow this link to download the following files:
1) p10404530_112030_LINUX_1of7.zip
2) p10404530_112030_LINUX_2of7.zip
3) p10404530_112030_LINUX_3of7.zip
First two files are for 11g database installer and third file is for 11g grid infrastructure which needs to be run before using ASM or before setting up cluster services for RAC database.
11g grid infrastructure will be installed in a seperate ORACLE_HOME then that of database and with different OS user as recommended by oracle. So, we have to create OS user “grid” and following OS groups:
1) asmdba
2) asmoper
3) asmadmin
Make sure that OS user “grid” has primary group as “oinstall” and secondary groups as “dba”, “asmdba”, “asmoper” and “asmadmin”. We need to modify OS user “oracle” too a bit. we need to add “asmdba” as secondary group to OS user “oracle”. After all this our OS users “grid” and “oracle” should look like below:
[oracle@NODE1 ~]$ id
uid=54321(oracle) gid=54321(oinstall) groups=54321(oinstall),54322(dba),54323(asmdba)

[grid@NODE1 ~]$ id
uid=54322(grid) gid=54321(oinstall) groups=54321(oinstall),54322(dba),54323(asmdba),54324(asmoper),54325(asmadmin)
Now, we unzip the files to some location on server and then run the runInstaller from the grid folder which will be created after unzipping the above files. In my case location of installer is /u01/11g_soft/11203_soft/grid. Following are the screen shots for grid infrastructure installation:
![]()
Start the installer from ./runInstaller command as in above screen shot.

Select “skip software update” and click next>

Select the “configure grid infrastructure for standalone server” as we not using ASM for RAC database.

click next>

On this screen, you can see the disks which i created earlier. I have keept the redundency “External” so that only one disk is required for a disk group. For redundancy “Normal” we need to have a two disks in a diskgroup and for “High” we need a minimum for three disks. Allocation unit size of 1MB is fine. Select the disk which has to be added to diskgroup named “+DATA”.

Provide password for SYS and ASMSNMP accounts for the ASM instance.

if you created all the groups mentioned earlier in this post then default selection should be fine.

Choose the ORACLE_BASE and ORACLE_HOME location. Make sure that ORACLE_HOME location is different then from database home location. In my case locations are as:
ASM ORACLE_HOME=/u01/app/grid/product/11.2.0/grid
DB ORACLE_HOME=/u01/app/oracle/product/11.2.0

click next>

wait for installation to prompt for root.sh

run the root.sh from location mentioned above.
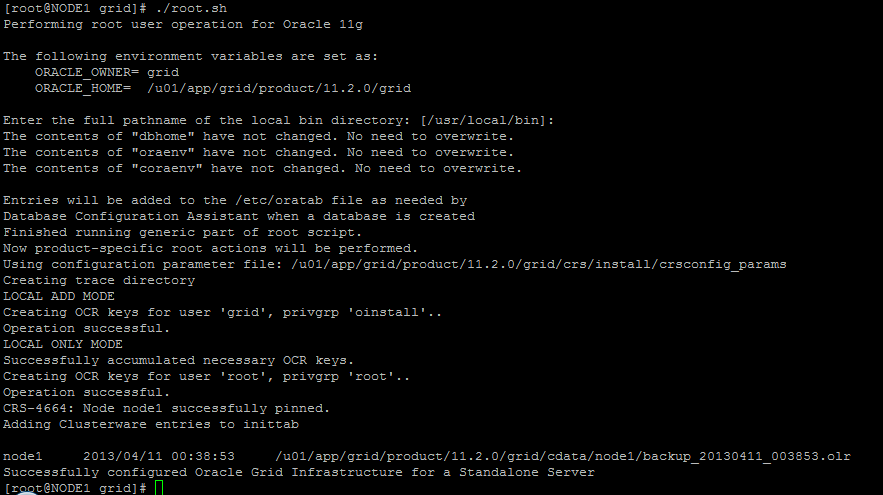
Once root.sh is run successfully as in above screen shot, installation is completed for grid infrastructure with a ASM instance +ASM running on server.

alert_+ASM.log can be found at location /u01/app/grid/diag/asm/+asm/+ASM/trace and below services are running from os user “grid” on server.
[grid@NODE1 ~]# ps -ef|grep grid
grid      3890     1  0 06:27 ?        00:00:02 /u01/app/grid/product/11.2.0/grid/bin/ohasd.bin reboot
grid      4444     1  0 06:28 ?        00:00:05 /u01/app/grid/product/11.2.0/grid/bin/oraagent.bin
grid      4457     1  0 06:28 ?        00:00:00 /u01/app/grid/product/11.2.0/grid/bin/tnslsnr LISTENER -inherit
grid      4469     1  0 06:28 ?        00:00:00 /u01/app/grid/product/11.2.0/grid/bin/evmd.bin
grid      4476     1  0 06:28 ?        00:00:00 /u01/app/grid/product/11.2.0/grid/bin/cssdagent
grid      4501     1  0 06:28 ?        00:00:00 /u01/app/grid/product/11.2.0/grid/bin/ocssd.bin
grid      4523  4469  0 06:28 ?        00:00:00 /u01/app/grid/product/11.2.0/grid/bin/evmlogger.bin -o /u01/app/grid/product/11.2.0/grid/evm/log/evmlogger.info -l /u01/app/grid/product/11.2.0/grid/evm/log/evmlogger.log
grid      4586     1  0 06:29 ?        00:00:00 asm_pmon_+ASM
grid      4588     1  0 06:29 ?        00:00:00 asm_psp0_+ASM
grid      4590     1  0 06:29 ?        00:00:09 asm_vktm_+ASM
grid      4594     1  0 06:29 ?        00:00:00 asm_gen0_+ASM
grid      4596     1  0 06:29 ?        00:00:00 asm_diag_+ASM
grid      4598     1  0 06:29 ?        00:00:01 asm_dia0_+ASM
grid      4600     1  0 06:29 ?        00:00:00 asm_mman_+ASM
grid      4602     1  0 06:29 ?        00:00:00 asm_dbw0_+ASM
grid      4604     1  0 06:29 ?        00:00:00 asm_lgwr_+ASM
grid      4606     1  0 06:29 ?        00:00:00 asm_ckpt_+ASM
grid      4608     1  0 06:29 ?        00:00:00 asm_smon_+ASM
grid      4610     1  0 06:29 ?        00:00:00 asm_rbal_+ASM
grid      4612     1  0 06:29 ?        00:00:00 asm_gmon_+ASM
grid      4614     1  0 06:29 ?        00:00:00 asm_mmon_+ASM
grid      4616     1  0 06:29 ?        00:00:00 asm_mmnl_+ASM
grid      4618     1  0 06:29 ?        00:00:00 oracle+ASM (DESCRIPTION=(LOCAL=YES)(ADDRESS=(PROTOCOL=beq)))
root      4851  4810  0 07:05 pts/2    00:00:00 grep grid
Now, after our ASM instance is ready, we are all set for moving our database to ASM disks. Below are steps to move non-asm database to ASM. First of all get the details of all the file which needs to be moce to ASM.
SQL> select name from v$database;

NAME
---------
YYAPRD

SQL> select file_name from dba_data_files;

FILE_NAME
--------------------------------------------------
/u04/oradata/YYAPRD/system01.dbf
/u04/oradata/YYAPRD/sysaux01.dbf
/u04/oradata/YYAPRD/undotbs01.dbf
/u04/oradata/YYAPRD/users01.dbf

SQL> select file_name from dba_temp_files;

FILE_NAME
--------------------------------------------------
/u04/oradata/YYAPRD/temp01.dbf

SQL> col member form a50
SQL> select member from v$logfile;

MEMBER
--------------------------------------------------
/u02/oradata/YYAPRD/redo01a.log
/u03/oradata/YYAPRD/redo01b.log
/u02/oradata/YYAPRD/redo02a.log
/u03/oradata/YYAPRD/redo02b.log
/u02/oradata/YYAPRD/redo03a.log
/u03/oradata/YYAPRD/redo03b.log

6 rows selected.

SQL> show parameter spfile

NAME                                 TYPE                             VALUE
------------------------------------ -------------------------------- ------------------------------
spfile                               string                           /u01/app/oracle/product/11.2.0
                                                                      .3/dbs/spfileYYAPRD.ora
SQL> show parameter control_file

NAME                                 TYPE                             VALUE
------------------------------------ -------------------------------- ------------------------------
control_file_record_keep_time        integer                          7
control_files                        string                           /u01/oradata/YYAPRD/control01.
                                                                      ctl, /u02/oradata/YYAPRD/contr
                                                                      ol02.ctl, /u03/oradata/YYAPRD/
                                                                      control03.ctl
Now, changed the location for control_file parameter to newly created ASM disks and set parameter DB_CREATE_FILE_DEST to ASM disks which will be used for datafiles. This parameter will serve as default location for all the datafiles which will be created in database. I am using multiplexing for controlfiles, so using two disk groups “+DATA” and “+DATA1”. Once parameters are set, restart the database in nomount state for RMAN to start movement.
SQL> alter system set control_files='+DATA','+DATA1' scope=spfile;

System altered.

SQL> alter system set db_create_file_dest='+DATA' scope=spfile;

System altered.

SQL> shutdown immediate;
Database closed.
Database dismounted.
ORACLE instance shut down.
SQL>
SQL>
SQL> startup nomount
ORACLE instance started.

Total System Global Area 2042241024 bytes
Fixed Size                  1345968 bytes
Variable Size             838862416 bytes
Database Buffers         1191182336 bytes
Redo Buffers               10850304 bytes
SQL> exit
Disconnected from Oracle Database 11g Enterprise Edition Release 11.2.0.3.0 - Production
With the Partitioning, OLAP, Data Mining and Real Application Testing options
Now, connect with rman and restore control file first from the existing one. This is create a new control file in ASM disk “+DATA” and “+DATA1” and then mount the database and backup the database as copy in ASM disk “+DATA” and as last step switch database to copy. Following is the logs from this activity.
[oracle@NODE1 11.2.0.3]$ rman target /

Recovery Manager: Release 11.2.0.3.0 - Production on Mon Apr 8 23:24:36 2013

Copyright (c) 1982, 2011, Oracle and/or its affiliates.  All rights reserved.

connected to target database: YYAPRD (not mounted)

RMAN> restore controlfile from '/u01/oradata/YYAPRD/control01.ctl';

Starting restore at 08-APR-13
using channel ORA_DISK_1

channel ORA_DISK_1: copied control file copy
output file name=+DATA/yyaprd/controlfile/current.256.812244559
output file name=+DATA1/yyaprd/controlfile/current.256.812244561
Finished restore at 08-APR-13

RMAN> alter database mount;

database mounted
released channel: ORA_DISK_1

RMAN> backup as copy database format '+DATA';

Starting backup at 08-APR-13
allocated channel: ORA_DISK_1
channel ORA_DISK_1: SID=5 device type=DISK
channel ORA_DISK_1: starting datafile copy
input datafile file number=00001 name=/u04/oradata/YYAPRD/system01.dbf
output file name=+DATA/yyaprd/datafile/system.257.812244625 tag=TAG20130408T233025 RECID=1 STAMP=812244720
channel ORA_DISK_1: datafile copy complete, elapsed time: 00:01:35
channel ORA_DISK_1: starting datafile copy
input datafile file number=00004 name=/u04/oradata/YYAPRD/users01.dbf
output file name=+DATA/yyaprd/datafile/users.258.812244721 tag=TAG20130408T233025 RECID=2 STAMP=812244816
channel ORA_DISK_1: datafile copy complete, elapsed time: 00:01:45
channel ORA_DISK_1: starting datafile copy
input datafile file number=00002 name=/u04/oradata/YYAPRD/sysaux01.dbf
output file name=+DATA/yyaprd/datafile/sysaux.259.812244827 tag=TAG20130408T233025 RECID=3 STAMP=812244873
channel ORA_DISK_1: datafile copy complete, elapsed time: 00:00:55
channel ORA_DISK_1: starting datafile copy
input datafile file number=00003 name=/u04/oradata/YYAPRD/undotbs01.dbf
output file name=+DATA/yyaprd/datafile/undotbs.260.812244881 tag=TAG20130408T233025 RECID=4 STAMP=812244927
channel ORA_DISK_1: datafile copy complete, elapsed time: 00:00:55
channel ORA_DISK_1: starting datafile copy
copying current control file
output file name=+DATA/yyaprd/controlfile/backup.261.812244937 tag=TAG20130408T233025 RECID=5 STAMP=812244940
channel ORA_DISK_1: datafile copy complete, elapsed time: 00:00:07
channel ORA_DISK_1: starting full datafile backup set
channel ORA_DISK_1: specifying datafile(s) in backup set
including current SPFILE in backup set
channel ORA_DISK_1: starting piece 1 at 08-APR-13
channel ORA_DISK_1: finished piece 1 at 08-APR-13
piece handle=+DATA/yyaprd/backupset/2013_04_08/nnsnf0_tag20130408t233025_0.262.812244945 tag=TAG20130408T233025 comment=NONE
channel ORA_DISK_1: backup set complete, elapsed time: 00:00:01
Finished backup at 08-APR-13

RMAN> switch database to copy;

datafile 1 switched to datafile copy "+DATA/yyaprd/datafile/system.257.812244625"
datafile 2 switched to datafile copy "+DATA/yyaprd/datafile/sysaux.259.812244827"
datafile 3 switched to datafile copy "+DATA/yyaprd/datafile/undotbs.260.812244881"
datafile 4 switched to datafile copy "+DATA/yyaprd/datafile/users.258.812244721"

RMAN> alter database open;

database opened

RMAN> exit

Recovery Manager complete.
Now, we need to move the temporary tablespace files and online redo logfiles to ASM. Best way is to create new ones in ASM and drop the old ones. Following the steps to do that.
SQL> select file_name from dba_data_files;

FILE_NAME
--------------------------------------------------
+DATA/yyaprd/datafile/system.257.812244625
+DATA/yyaprd/datafile/sysaux.259.812244827
+DATA/yyaprd/datafile/undotbs.260.812244881
+DATA/yyaprd/datafile/users.258.812244721

SQL> alter tablespace temp add tempfile size 500M;

Tablespace altered.

SQL> select file_name from dba_temp_files;

FILE_NAME
--------------------------------------------------
/u04/oradata/YYAPRD/temp01.dbf
+DATA/yyaprd/tempfile/temp.263.812245559

SQL> alter database tempfile '/u04/oradata/YYAPRD/temp01.dbf' drop including datafiles;

Database altered.

SQL> select file_name from dba_temp_files;

FILE_NAME
--------------------------------------------------
+DATA/yyaprd/tempfile/temp.263.812245559

SQL> alter database add logfile group 4 ('+DATA','+DATA1') size 10M;

Database altered.

SQL> alter database add logfile group 5 ('+DATA','+DATA1') size 10M;

Database altered.

SQL> alter database add logfile group 6 ('+DATA','+DATA1') size 10M;

Database altered.

SQL> select * from v$log;

    GROUP#    THREAD#  SEQUENCE#      BYTES  BLOCKSIZE    MEMBERS ARC STATUS           FIRST_CHANGE# FIRST_TIME  NEXT_CHANGE# NEXT_TIME
---------- ---------- ---------- ---------- ---------- ---------- --- ---------------- ------------- ----------- ------------ -----------
         1          1        115   10485760        512          2 NO  INACTIVE                244292 08-APR-2013       268271 08-APR-2013
         2          1        116   10485760        512          2 NO  INACTIVE                268271 08-APR-2013       271180 08-APR-2013
         3          1        117   10485760        512          2 NO  CURRENT                 271180 08-APR-2013   2.8147E+14
         4          1          0   10485760        512          2 YES UNUSED                       0                        0
         5          1          0   10485760        512          2 YES UNUSED                       0                        0
         6          1          0   10485760        512          2 YES UNUSED                       0                        0

		 SQL> alter database drop logfile group 1;

Database altered.

SQL> alter database drop logfile group 2;

Database altered.

SQL> alter system switch logfile;

System altered.

SQL> select * from v$log;

    GROUP#    THREAD#  SEQUENCE#      BYTES  BLOCKSIZE    MEMBERS ARC STATUS           FIRST_CHANGE# FIRST_TIME  NEXT_CHANGE# NEXT_TIME
---------- ---------- ---------- ---------- ---------- ---------- --- ---------------- ------------- ----------- ------------ -----------
         3          1        117   10485760        512          2 NO  INACTIVE                271180 08-APR-2013       274462 08-APR-2013
         4          1        118   10485760        512          2 NO  INACTIVE                274462 08-APR-2013       274465 08-APR-2013
         5          1        119   10485760        512          2 NO  CURRENT                 274465 08-APR-2013   2.8147E+14
         6          1          0   10485760        512          2 YES UNUSED                       0                        0

SQL> alter database drop logfile group 3;

Database altered.

SQL> select member from v$logfile;

MEMBER
--------------------------------------------------
+DATA/yyaprd/onlinelog/group_4.264.812246035
+DATA1/yyaprd/onlinelog/group_4.257.812246037
+DATA/yyaprd/onlinelog/group_5.265.812246095
+DATA1/yyaprd/onlinelog/group_5.258.812246097
+DATA/yyaprd/onlinelog/group_6.266.812246115
+DATA1/yyaprd/onlinelog/group_6.259.812246117

6 rows selected.
Now, the DB is migrated to ASM. Other things like FRA, archivlogs can be moved to ASM also by setting the respective parameters for these features.
